Introduction
It is common for ASP.NET developers to adopt lax practices in their management of JavaScript. I believe this is because there is not a lot of reliable information online for how to properly deal with JavaScript in an ASP.NET application. The purpose of this article is to present an optimal technique to manage your JavaScript in your ASP.NET applications. The following issues will be addressed:
- Inline JS. Page bloat caused by placing JavaScript directly in the page.
- Deploying JS. Forgetting to deploy JavaScript files.
- Bad References. Links to JavaScript not working when used in another web application.
- Dependencies. Needing to remember dependencies between JavaScript files.
- Unused JS. Referencing JavaScript on pages it is not used.
- HTTP / HTTPS. Referencing JavaScript over HTTP from an HTTPS page.
- Refactoring. Refactoring for a new version can take some time.
- Redundancy. Including a JavaScript file more than once.
Contents
Prerequisites
Make sure you have Visual Studio 2010. Some concepts presented in this article may not work with the Express editions.
Overview
Most of the above problems are caused by placing JavaScript or references to JavaScript files directly in the ASPX page. The solution to almost all of the above problems is to use ASP.NET's built-in capability to embed JavaScript files into a DLL and then reference those files dynamically. This article will present those capabilities, as well as some techniques to take full advantage of them. A tutorial format will be used to explain how each step is done.
Getting Started
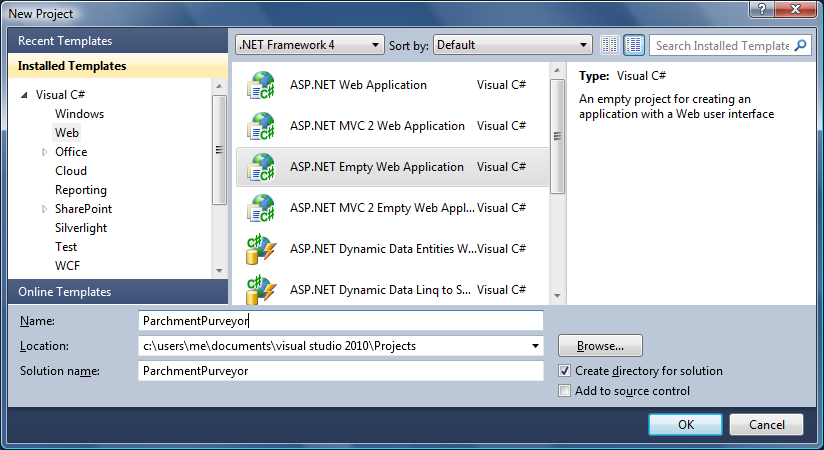
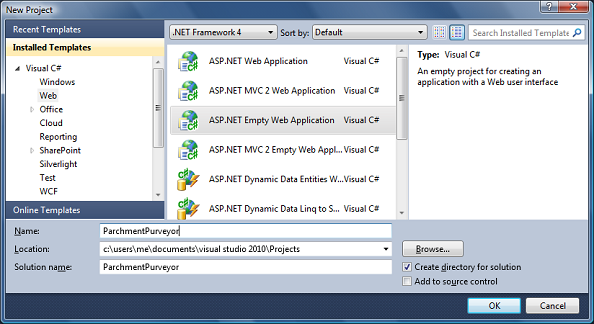
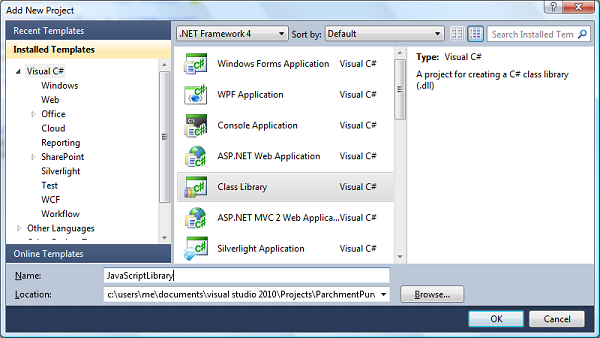
First things first. Start up Visual Studio 2010 and create a new empty web application called
ParchmentPurveyor (we are making a website for somebody who wants to sell fancy paper):
Now, add a new web form called "Default.aspx", and add some simple HTML to it. It should look something like this:
 Collapse
<%@ Page Language="C#" AutoEventWireup="true" CodeBehind="Default.aspx.cs"
    Inherits="ParchmentPurveyor.Default" %>

<html xmlns="http://www.w3.org/1999/xhtml">
<head runat="server">
    <title>Parchment Purveyor</title>
</head>
<body>
    <form id="form1" runat="server">
        <h1>Parchment Purveyor</h1>
        <p>Paper for printers, painting, publication,
            paper planes, and plenty of other plebeian projects!</p>
    </form>
</body>
</html>
Adding JavaScript
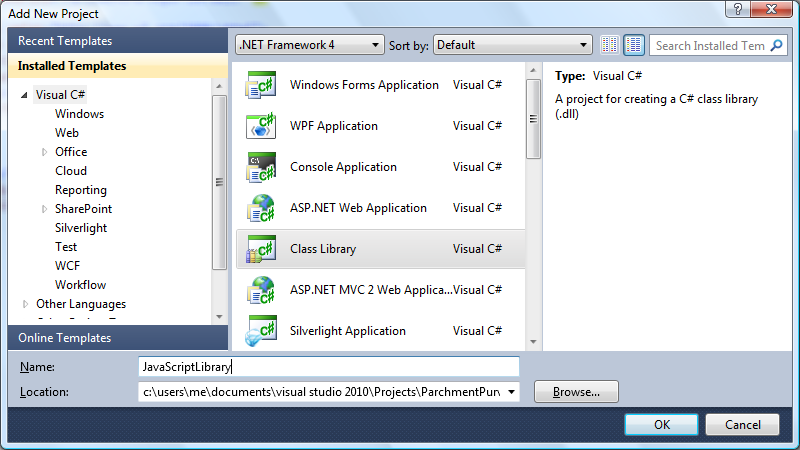
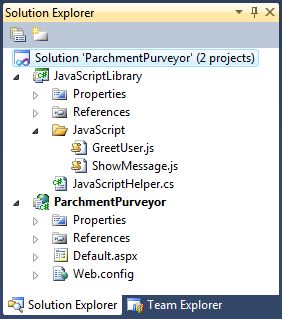
Now that we have a fully functional website that is sure to get the attention of a plethora of people, we can focus on the JavaScript coding. Rather than add a JavaScript file our main project, however, we will do things a little differently. We are going to create a new project to hold all of our JavaScript files. Start by adding a new class library project, called
JavaScriptLibrary, to the solution:
When you added that project, a file called "Class1.cs" was added for you. We don't need that, so delete it. Add a folder to
JavaScriptLibrary called "JavaScript". You will also add two JavaScript files to that folder. Call them "ShowMessage.js" and "GreetUser.js". Next, create a new class called
JavaScriptHelper (do not place this in the "JavaScript" folder... it will go at the root level of the
JavaScriptLibrary project). By now, your solution structure should look something like the following:
A couple of empty JavaScript files aren't going to do us any good, so let's put something in them. For starters, "ShowMessage.js" will hold a function called
ShowMessage():
Collapse function ShowMessage(msg) {
alert("Message From Website: " + msg);
}The "GreetUser.js" file will have its own function,
GreetUser():
Collapse function GreetUser() {
ShowMessage("Greetings and Salutations!");
}Notice that
GreetUser() is dependent upon
ShowMessage(). We will be handling that later.
Embedding the JavaScript Files
Rather than have to deploy our JavaScript files to our website, we'd like them to be embedded into the DLL. That way, if the DLL is deployed to the website, all JavaScript files are also automatically deployed. Doing this is very simple; all we need to do is go to the properties for each JavaScript file and change the "build action" from "content" to "embedded resource":

While that will ensure the files get embedded into the DLL, you must still make them available to the web client. Before you do that, the
JavaScriptLibrary project needs to reference
System.Web:

Once you have added that reference, edit "JavaScriptHelper.cs" by adding the following
using statement and assembly attributes:
Collapse using System.Web.UI;
[assembly: WebResource("JavaScriptLibrary.JavaScript.ShowMessage.js", "application/x-javascript")]
[assembly: WebResource("JavaScriptLibrary.JavaScript.GreetUser.js", "application/x-javascript")]That will enable your embedded JavaScript files to be accessible from the client computer.
Including the Embedded JavaScript Files
Now that you have embedded the JavaScript files and made them accessible via the client computer, you must actually reference them from the pages they are used on. To facilitate this, we will fill in our
JavaScriptHelper class:
Collapse using System;
using System.Web.UI;

[assembly: WebResource("JavaScriptLibrary.JavaScript.ShowMessage.js", "application/x-javascript")]
[assembly: WebResource("JavaScriptLibrary.JavaScript.GreetUser.js", "application/x-javascript")]
namespace JavaScriptLibrary
{
public class JavaScriptHelper
{
#region Constants
private const string NAME_SHOW_MESSAGE = "JavaScriptLibrary.JavaScript.ShowMessage.js";
private const string NAME_GREET_USER = "JavaScriptLibrary.JavaScript.GreetUser.js";
#endregion
#region Public Methods
public static void Include_ShowMessage(ClientScriptManager manager)
{
IncludeJavaScript(manager, NAME_SHOW_MESSAGE);
}
public static void Include_GreetUser(ClientScriptManager manager)
{
Include_ShowMessage(manager);
IncludeJavaScript(manager, NAME_GREET_USER);
}
#endregion
#region Private Methods
private static void IncludeJavaScript(ClientScriptManager manager, string resourceName)
{
var type = typeof(JavaScriptLibrary.JavaScriptHelper);
manager.RegisterClientScriptResource(type, resourceName);
}
#endregion
}
}The
IncludeJavaScript() function is what does all the magic. It ensures a
script tag gets inserted for an embedded JavaScript file, which it does by calling
RegisterClientScriptResource().
IncludeJavaScript() is called by
Include_GreetUser(). Notice also that
Include_GreetUser() calls
Include_ShowMessage(), which means it handles dependencies for the user of the class. Any page that includes the
GreetUser() function will also include the
ShowMessage() function.
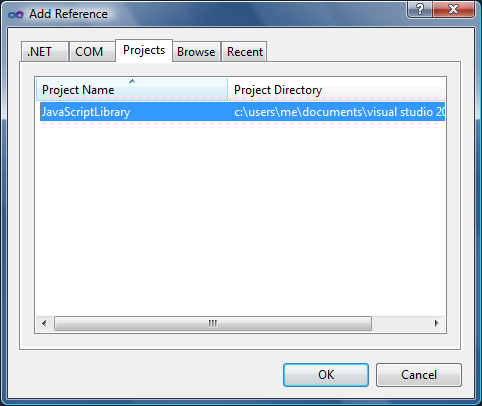
Now that we have that class available for our use, let's put it to use on the "Default.aspx" page. You can start by making sure
ParchmentPurveyor has a reference to
JavaScriptLibrary:
Next, we'll need to modify the code behind to include the JavaScript on the page.
Collapse using System;
using System.Web.UI;
namespace ParchmentPurveyor
{
public partial class Default : System.Web.UI.Page
{
protected override void OnPreRender(EventArgs e)
{
base.OnPreRender(e);
JavaScriptLibrary.JavaScriptHelper.Include_GreetUser(Page.ClientScript);
}
}
}Finally, we just have one thing left to do -- call the
GreetUser() function from the page. To do this, all we need to do is add the following JavaScript to the page (I chose to add it in the
head tag):
Collapse <head runat="server">
<title>Parchment Purveyor</title>
<script type="text/javascript">
window.onload = function () { GreetUser(); };
</script>
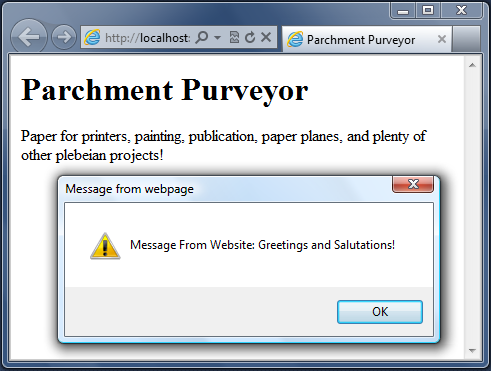
</head>That's it! You are done! Well, mostly. There are a few more niggling cases to handle. Before we get to those, however, let's look at the fruits of our labor:
Here is what your HTML might look like when you view the source of the page (I shortened and removed some values):
Collapse <html xmlns="http://www.w3.org/1999/xhtml">
<head><title>
Parchment Purveyor
</title>
<script type="text/javascript">
window.onload = function () { GreetUser(); };
</script>
</head>
<body>
<form method="post" action="Default.aspx" id="form1">
<div class="aspNetHidden">
<input type="hidden" name="__VIEWSTATE" id="__VIEWSTATE" value="..." />
</div>
<script src="http://www.codeproject.com/WebResource.axd?d=fslk3GLsk3Slek&t=1234" type="text/javascript"></script>
<script src="http://www.codeproject.com/WebResource.axd?d=fglk3kSl3LS5&t=5678" type="text/javascript"></script>
<h1>Parchment Purveyor</h1>
<p>Paper for printers, painting, publication,
paper planes, and plenty of other plebeian projects!</p>
</form>
</body>
</html>Notice there are two
script tags that reference something called "WebResource.axd". That is basically a service which serves embedded information to the client. You can read more about "WebResource.axd"
here. The important thing to note is that the first
script tag is serving up the
ShowMessage() function and the second
script tag is serving up the
GreetUser() function. Both of those
script tags were included in the page when you called the
Include_GreetUser() function in your JavaScript library.
Late Includes
Sometimes, the above technique does not include the JavaScript file. For example, I work with a third party tool that prevents me from calling .Net code before the render stage. When you call the include functions above during the render stage, the
script tags do not get inserted into the page. This is because the beginning of the page has already been rendered to HTML. My solution to this problem is to create an alternate form of the function that inserts the
script tag near the bottom of the HTML. I call this a "late include". We can support this technique with a few changes to
JavaScriptHelper:
Collapse using System;
using System.Web;
using System.Web.UI;
[assembly: WebResource("JavaScriptLibrary.JavaScript.ShowMessage.js", "application/x-javascript")]
[assembly: WebResource("JavaScriptLibrary.JavaScript.GreetUser.js", "application/x-javascript")]
namespace JavaScriptLibrary
{
public class JavaScriptHelper
{
#region Constants
private const string TEMPLATE_SCRIPT = "<script type=\"text/javascript\" src=\"{0}\"></script>\r\n";
private const string NAME_SHOW_MESSAGE = "JavaScriptLibrary.JavaScript.ShowMessage.js";
private const string NAME_GREET_USER = "JavaScriptLibrary.JavaScript.GreetUser.js";
#endregion
#region Public Methods
public static void Include_ShowMessage(ClientScriptManager manager, bool late = false)
{
IncludeJavaScript(manager, NAME_SHOW_MESSAGE, late);
}
public static void Include_GreetUser(ClientScriptManager manager, bool late = false)
{
Include_ShowMessage(manager, late);
IncludeJavaScript(manager, NAME_GREET_USER, late);
}
#endregion
#region Private Methods
private static void IncludeJavaScript(ClientScriptManager manager, string resourceName, bool late)
{
var type = typeof(JavaScriptLibrary.JavaScriptHelper);
if (!manager.IsStartupScriptRegistered(type, resourceName))
{
if (late)
{
var url = manager.GetWebResourceUrl(type, resourceName);
var scriptBlock = string.Format(TEMPLATE_SCRIPT, HttpUtility.HtmlEncode(url));
manager.RegisterStartupScript(type, resourceName, scriptBlock);
}
else
{
manager.RegisterClientScriptResource(type, resourceName);
manager.RegisterStartupScript(type, resourceName, string.Empty);
}
}
}
#endregion
}
}I modified each method to accept an additional parameter,
late. This defaults to
false, so the methods can still be called the same way they used to be. A value of false will preserve the old behavior. A value of true will cause the
script blocks to be included near the end of the HTML. Note also that in the case that
late is
false, I still call
RegisterStartupScript(), but I pass it an empty string (so that function call does not actually insert anything into the HTML). This is done so
IsStartupScriptRegistered() will return the correct value. That way, the JavaScript will never be included more than once, even if one of the functions is called with
late set to
false and then again with
late set to
true. If you want to see this in action, comment out the
OnPreRender() in the code behind and modify the
body of the page to look like this:
Collapse <body>
<form id="form1" runat="server">
<h1>Parchment Purveyor</h1>
<p>Paper for printers, painting, publication,
paper planes, and plenty of other plebeian projects!</p>
<% JavaScriptLibrary.JavaScriptHelper.Include_GreetUser(Page.ClientScript, true); %>
</form>
</body>That will call the version of the function that includes the
script tags near the bottom of the HTML, which you can observe by viewing the source of the page when you run the application.
External JavaScript
So far, I've only demonstrated how to include embedded JavaScript. However, it is sometimes desirable to link to an external JavaScript file. To facilitate this, we need to add a new helper function in
JavaScriptHelper:
Collapse private static void IncludeExternalJavaScript(Page page, string key, string httpUrl, string httpsUrl, bool late)
{
var manager = page.ClientScript;
var type = typeof(JavaScriptLibrary.JavaScriptHelper);
bool isStartupRegistered = manager.IsStartupScriptRegistered(type, key);
bool isScriptRegistered = manager.IsClientScriptIncludeRegistered(type, key);
if (!(isStartupRegistered || isScriptRegistered))
{
string url;
if (page.Request.Url.Scheme.ToLower() == "http")
{
url = httpUrl;
}
else
{
url = httpsUrl;
}
if (late)
{
manager.RegisterStartupScript(type, key, string.Format(TEMPLATE_SCRIPT, HttpUtility.HtmlEncode(url)));
}
else
{
manager.RegisterClientScriptInclude(type, key, url);
}
}
}As an example of an external file you might include, I'll use the jQuery file hosted by Microsoft's CDN. Just like the other JavaScript files, you will create a function in
JavaScriptHelper to include jQuery on the page:
Collapse private const string NAME_JQUERY = "jQuery";
private const string URL_JQUERY = "http://ajax.aspnetcdn.com/ajax/jQuery/jquery-1.5.1.js";
private const string URL_JQUERY_HTTPS = "https://ajax.aspnetcdn.com/ajax/jQuery/jquery-1.5.1.js";
public static void Include_jQuery(Page page, bool late = false)
{
if (page == null)
{
page = (Page)HttpContext.Current.Handler;
}
IncludeExternalJavaScript(page, NAME_JQUERY, URL_JQUERY, URL_JQUERY_HTTPS, late);
}Finally, you can include jQuery on your page by calling your function from the
OnPreRender() function in your page:
Collapse protected override void OnPreRender(EventArgs e)
{
base.OnPreRender(e);
JavaScriptLibrary.JavaScriptHelper.Include_jQuery(Page);
JavaScriptLibrary.JavaScriptHelper.Include_GreetUser(Page.ClientScript);
}If you run your application and view the source of the page, you'll see that jQuery gets included:
Collapse <script src="http://ajax.aspnetcdn.com/ajax/jQuery/jquery-1.5.1.js" type="text/javascript"></script>
Adding New JavaScript Files
Once you have everything setup, there are only a few steps you need to complete when adding new JavaScript files:
- Add the ".js" file to the "JavaScript" folder. Skip this step for external JavaScript files.
- Set the "build action" to "embedded resource". Skip this step for external JavaScript files.
- Add the assembly attribute to indicate the JavaScript file is a web resource. Skip this step for external JavaScript files.
- Create a function in
JavaScriptHelper to include your JavaScript file.
- Call the function you just created from a page, control, or masterpage.
What Did You Gain?
After all this work with the same apparent HTML output, you might be asking yourself, "what did I really gain by adding all this extra code?" Well, here are a few solutions presented by this approach:
- Inline JS. You have reduced page bloat by avoiding putting your JavaScript library inline in the page.
- Deploying JS. You do not need to include the ".js" files when you deploy your web application. Deploying the DLL will be enough.
- Bad References. Even if you change the path of your application, you will not have to worry about changing your JavaScript paths.
- Dependencies. Dependencies are managed automatically. If you included "GreetUser.js", "ShowMessage.js" will automatically be included.
- Unused JS. No JavaScript is included on the page unless you call the function to include it. This will avoid having unused JavaScript on the page (potentially speeding up load times for users).
- HTTP / HTTPS. The code outputs
script tags that do not include the protocol, so the protocol should be the same as the current page (i.e., HTTP or HTTPS).
Article Source: http://www.codeproject.com/KB/aspnet/Manage_JS_In_AspNet.aspx